Easy DIY mother’s day gift idea – Box of Love
Nicknamed as “Box of Love”, this DIY gift is an excellent one to make your mother happy this Mother’s Day.
It’s easy to make if you have a few craft materials to home and it is not time-consuming at all.
If you ask me, making handmade gifts is a beautiful to express your love and gratitude toward someone as you are taking the time and effort to create it. And as a creator or a crafter, it is always a proud feeling to see the final result, isn’t it?
This DIY gift box tutorial has several steps. This tutorial will teach you how to make a paper box and then you can write personalized messages that you have always wanted to tell your mom.
So, shall we start?
Materials required:
- Pattern paper/ Colour paper of size 15cm*15cm to make the lid
- Color paper / Pattern paper of size 14.5 cm* 14.5 cm
- Color papers and white papers to make paper hearts
- Ribbon
- Paper glue
- Hot glue
If you don’t have pattern paper, it’s fine. You can use regular color paper. But pattern paper can make your box look prettier. Since we had the pattern paper at home, we used it.
So, let’s get started with the tutorial.
Step 1: Making the lid of the DIY paper box

Take a paper of size 15cm x 15cm (1a).
Fold it diagonally so that opposite corners meet and form a triangle (1b).
Make a crease and unfold (1c).
Now, fold diagonally in the opposite direction and make a crease (1d).

Unfold and fold like shown in the pic 1e. In this step, we fold the paper horizontally from bottom to top. Make a crease here.
Unfold again. Now, taking the creases we made as reference fold each corner one-by-one to the center (where the diagonal meet) as shown in pics 1f, 1g, and 1h.

After folding all the corners towards the center, we get the above shape (1i).
Step 2. Shaping the box

2a. In this step, we will fold all four horizontal edges towards the center. You can see that in each picture, each edge is folded towards the center. After folding each edge, remember to unfold before folding the next edge.
Make sure you fold all the four edges towards the centre and unfold them.

After folding towards the center in all four directions, unfold the paper and open it as shown in pic 2b.
Fold the right and left vertical edges towards the center by taking the crease we made earlier as the reference. (2c)
Now comes the tricky part. We are going to fold the paper from the sides to shape it into a box.
Start by opening up the middle section and raising the top corner. Since we have the creases made, it will automatically obtain the shape shown in the following picture.

Like seen in the picture, two corners should meet each other for the paper box to form the perfect shape (see the arrows pointing to the corners).
Now, push the raised corners towards the sides as shown in the following picture (see the arrows).


Now, bring the top corner towards the base of the paper box as shown in 2d and 2e.

Apply some glue to the corner and stick it to the base as shown in 2f. Turn the figure over (2g) and do the same with the opposite corner (2h) and your paper box is ready (2i).
This was the lid of the paper box. Now we need to make the box.
Step 3: Making the box
The procedure of making the paper box is exactly the same as making the lid. So, I am not going to go into the details. The only difference is that you need to take a square paper of size 14.5 cm so that the box can fit into the lid easily.
If you have any doubt, feel free to watch the video tutorial at the end of the post.
After making the box by following the steps 1 and 2, please proceed to step 4.
Step 4: Making Origami paper hearts

Cut a square paper of size 5cm*5cm. (4a).
Fold it diagonally so that the opposite corners meet and form a triangle(4b).
Unfold (4c).
Fold again diagonally in the opposite direction (4d).

Unfold and hold the paper as shown in pic 4e. And fold the top vertex towards the center (the point where the two diagonals meet) of the diamond shape marked as a black dotted line in pic 4e.
Fold the bottom corner upwards and let it’s vertex meet the top edge as shown in 4g.

Now, fold from the bottom right to top as shown in 4h and 4i.
Similarly, fold from the bottom left to top as shown in 4j.

In the next step, we will fold the pointed edges on the top and sides to shape the heart. So as shown in pics 4k, 4l and 4m, fold in the pointed corners of the paper heart.
Thus, the origami paper heart is ready! We need 4 in total for this project, so make 3 more.
Step 5: Write personalized messages

Cut four paper strips that can fit inside the paper hearts. And write the letters M, O, and M and a heart on them. Color it and write down your personalized messages on it (5a).
You can customise this part as you wish.
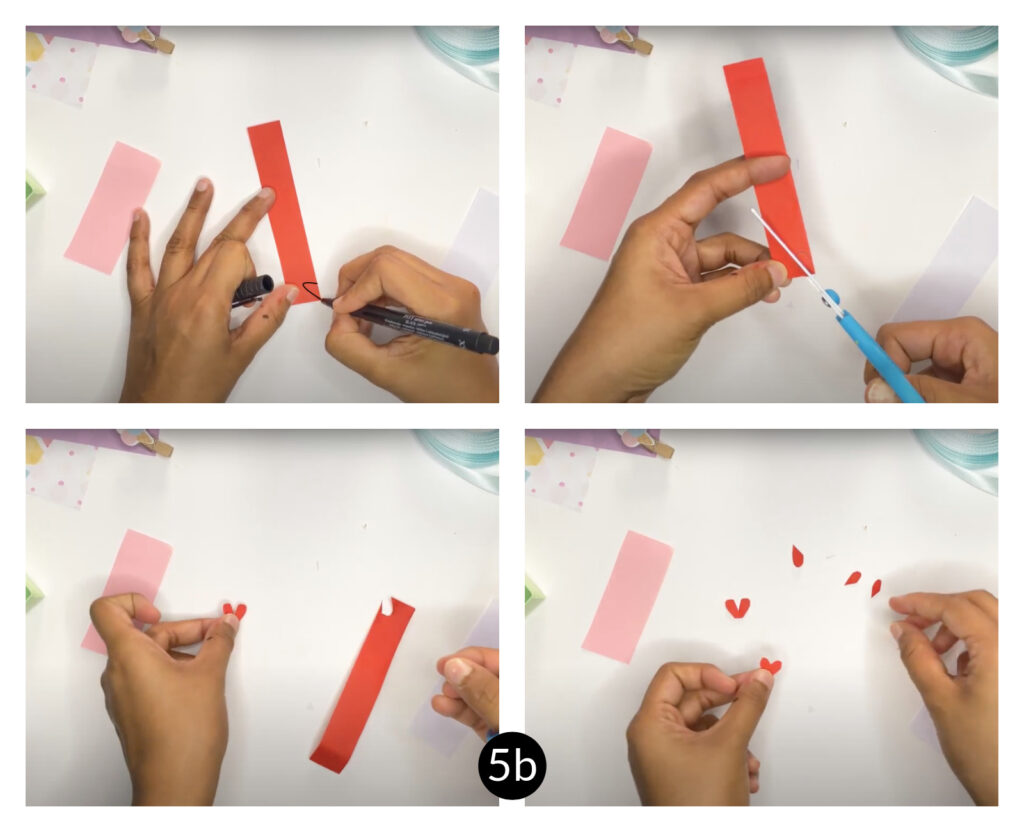
Now take another piece of paper, fold it in half and draw half of a heart on it. Cut along the shape and when you open you get a heart shape (5b).
Step 6: Putting it all together

Cut out many paper hearts (this is for decorative purposes) and put them in the box along with the four hearts with personalized messages. Cover with the lid and tie it with a ribbon (6a).

To keep the ribbon in place, glue it using hot glue on the base of the paper box. The correct way of tying the ribbon can be learned from the video tutorial below.
Thus the handmade Mother’s Day gift is ready.
Related:
Easy Mother’s Day greeting card idea for kids!Video tutorial to make handmade Mother’s Day Gift
We post easy craft video tutorials every week. So please don’t forget to subscribe to our Youtube channel.
