How to make an easy paper flower for kids
Flowers brighten up any space instantly. And you don’t always need fresh flowers to add beauty to your space.
Paper flowers can do the same. You can make paper flowers as home decor or as a fun useful craft to pass time with kids.
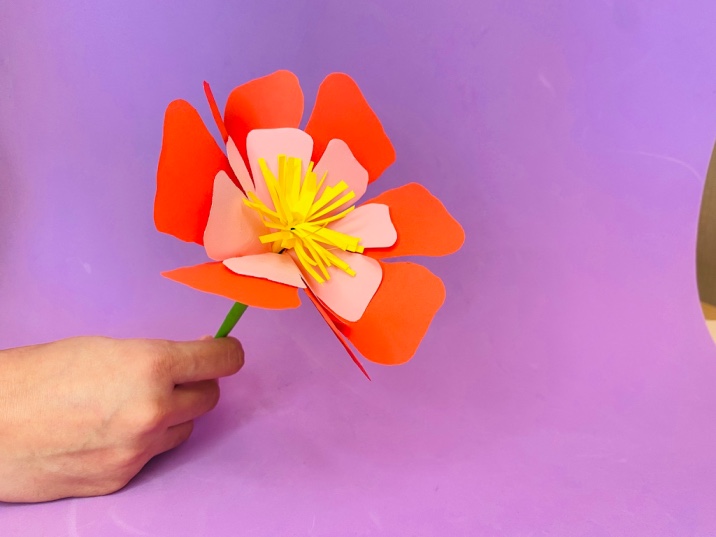
In this post, we have come up with a tutorial to make a beautiful and easy paper flower. There is no name yet for this flower. So, let’s just call it a “Random Beauty”.
If it resembles any flower you know, let me know in the comments below.
Materials required:
- Color paper (3 different colors). Here we chose red, rose and yellow.
- Scissors
- Glue
Step-by-step tutorial for a simple flower craft
Step 1: Cut a square paper to make the flower petals

Cut a square paper of size 15 cm (1a).
Fold it in half from bottom to top so that the bottom two vertices meet the top two vertices (1b). Make a crease (1c).
Now fold again in half from left to right and make a crease (1d).

Now, draw the shape of two petals as shown in pic 1e. Cut along the drawing (1f and 1g). You get the petal shape as shown in pic 1h.

The next step is to make a tiny hole at the opposite corner of the petal shape (1i). Open the figure to get one of the petal shapes (1j).
Step 2: Make the second petal layer
In this step, we are going to make the second smaller petal layer. For this, take another color paper of your choice.
We will repeat the same procedure as in step 1. So, I am not going to write about the details. You can understand the steps from the pictures below.
To make the next petal layer, cut a square of size 10cm.


Step 3: Make the center of the flower

Cut another color paper in rectangle shape of size 10cm x 4cm (3a).
Now fold it at a width of approximately 2-3 cm (3b). The width doesn’t matter here as this is just to make it easy to cut the paper thinly to make pistil stamen.
Keep folding it again and again at the same width until you reach a size shown in pic 3c and 3d.

Fold the remaining part (3e). And take a scissors to cut thin vertical lines as shown in pics 3f and 3g, leaving some width at the opposite edge to roll the paper so that we can make the stigma.
Open the paper and there you have the pistil stigma of the paper flower (3h). Keep it aside and let’s move on to making the sepal of the paper flower.
Step 4: Make the sepal of the flower

In this step, you have to hold the square paper without changing the position. It is important so as not to go wrong with the cutting.
Now, take a green color paper and cut a square of size 6cm (4a).
Fold it in half from the bottom to top (4b) and make a crease. Fold it again in half from left to right and make a crease (4c and 4d).

Now fold the square piece diagonally (from left top corner to right bottom corner) to get a rectangle as shown in pic 4e.
Keep the triangle in the exact position as shown in pic 4f.
Draw an arc starting from near the middle of the horizontal edge of the triangle. It’s not exactly middle, but a little bit towards the left vertex of the triangle (see the arrow in 4f).
Cut along the arc (4g). Now make a small cut at the bottom to make a hole to insert the stem later(4h). Be careful where you make the hole. When you look at the picture 4g, the base is the part that comes under the finger.
Step 5: Make the stem of the paper flower

To make the stem, take a green paper and cut a rectangle of size 10cm x 12 cm (5a). Now roll the paper diagonally as thin as possible (5b and 5c).
Apply glue at the end and stick it (5d).

Trim the edge to make the end of the stem look even (5e).
Step 6: Put it all together

6a. Take the pistil stigma paper piece and apply glue to its base. Keep the stem inside and roll it while making sure the stem is stuck to the stigma.

6b. Take the smaller petal layer (rose color)and apply glue to the center. Insert the stem into it along with the stigma. Press the base of the petal layer onto the base of the stigma piece and at the top of the stem. Make sure it is stuck well.
Now, take the bigger petal layer (red) and apply glue to the centre of it.

6c. Do the same procedure as with the rose layer. Let it stick well to the rose layer.
Now apply glue to the sepal and insert that as well and stick it to the base of the biggest layer.
Thus the easy paper flower is ready!
In case you have any doubt regarding any step, here is video tutorial to make the flower.
Video tutorial to make a simple flower for kids
More paper craft tutorials for kids: