Easy Paper Puzzle Game for kids
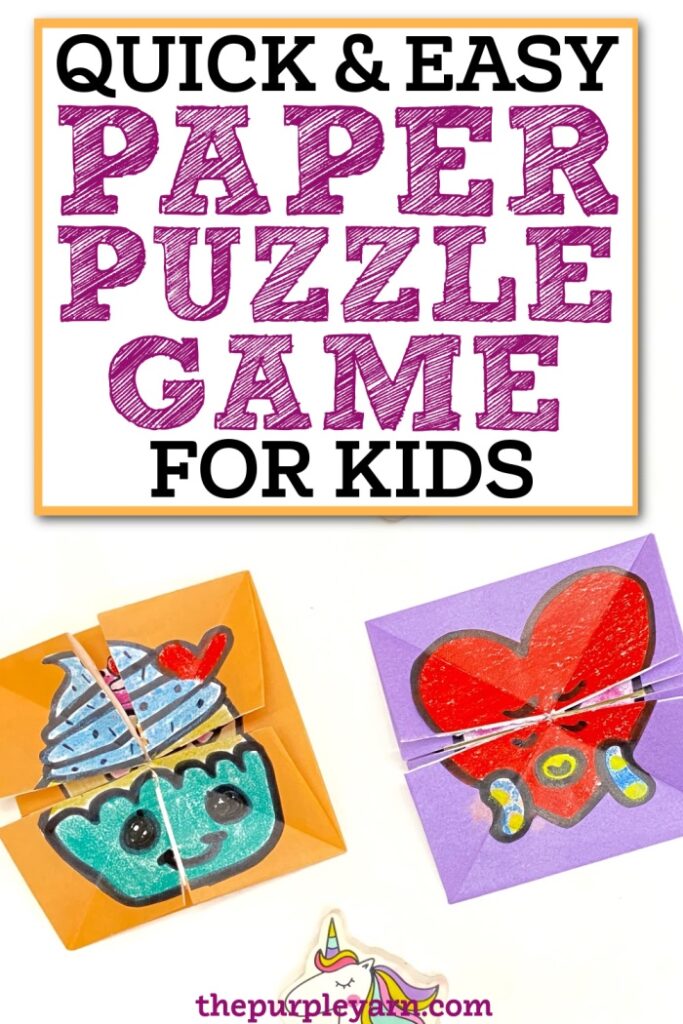
If you are wondering how to make a homemade picture puzzle game for kids, you are in the right place.
Here, we show you how to make a puzzle game using paper that can keep your kids busy for a few hours.
It’s a simple game that can be made using paper and a few basic supplies at home. So let’s see how you can make it at home.
Before getting into the tutorial I would appreciate it very much if you will check out our Youtube channel and subscribe to it. We add easy craft tutorials every week.
Some of the links in this post are affiliate links, which simply means that if you happen to purchase something, I get a small commission at NO extra cost to you.
Materials Required:
To make this paper puzzle, you need
– Origami sheet OR any square paper of size 15 cm
– White paper
– Pencil, Ruler, Scissors and Glue
– Black Marker Pen
– Oil pastels or Color markers
How to make a Picture Puzzle Game step-by-step
Step 1: Folding the puzzle
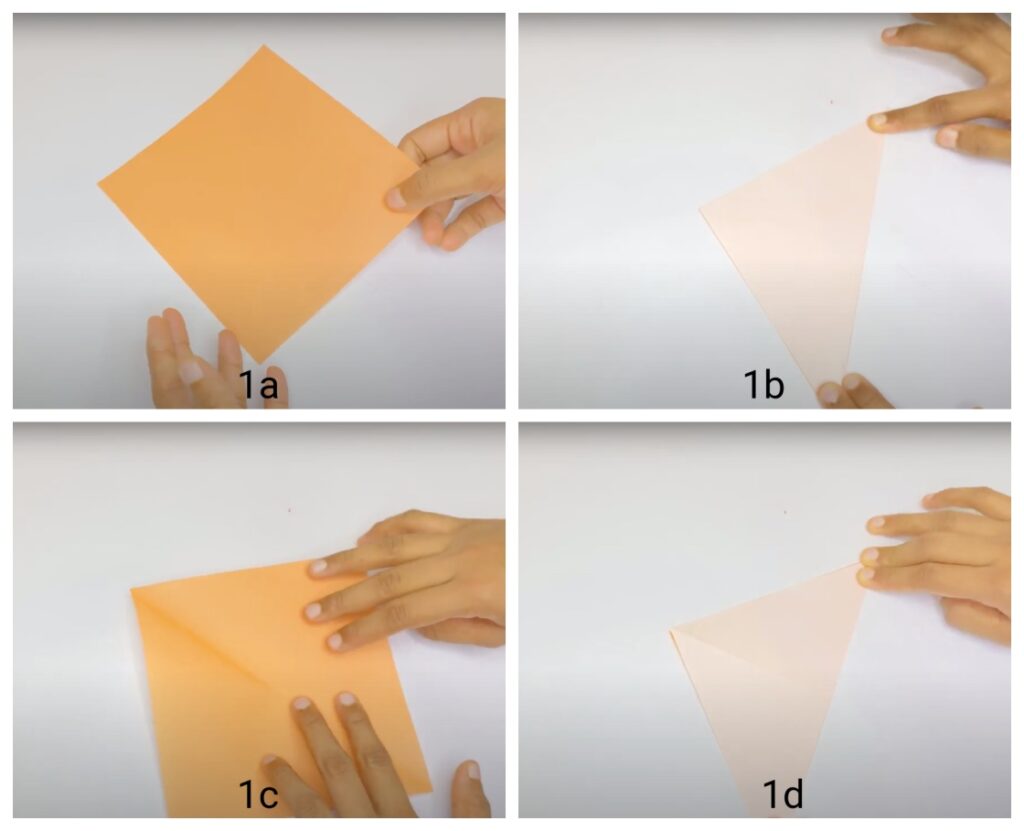
1a. Take a square sheet of size 15 cm. Here we are using an Origami sheet. You can use color papers used for crafts or even white paper.
1b. Fold the paper diagonally (from right to left) to join the opposite corners and make a crease. If you are using an Origami sheet, make sure the coloured part of the paper is inside while folding.
1c. Unfold.
1d. Now, fold the paper diagonally again (from left to right), this time to join the other two corners. Make a crease.
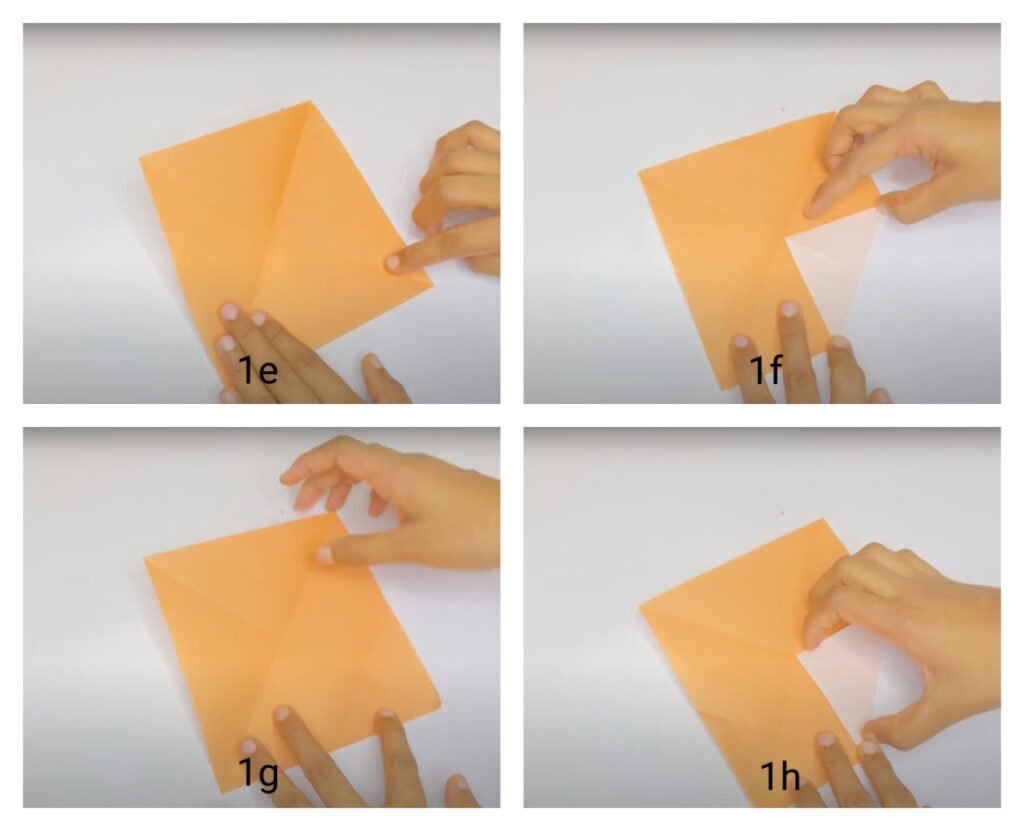
1e. After making the crease, unfold the paper. Now what we need to do is to fold each corner into the centre of the paper, make a crease and unfold.
1f-1h. Here we have not shown the folding of all 4 corners as it is rinse and repeat. But I hope you get the idea. Again, what you need to do is:
Fold each corner into the center and, make a crease and then unfold. Do it with all 4 corners and then proceed to the next step.
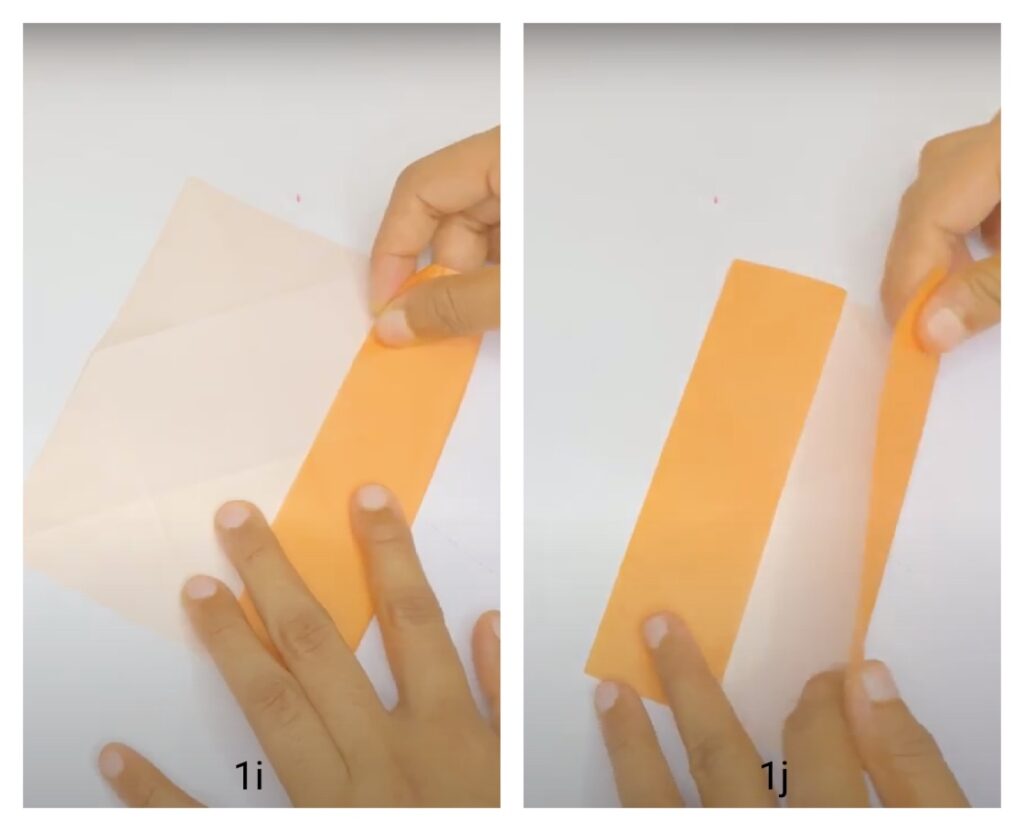
1i. In this step, we fold the paper to the center horizontally. Keep in mind that the paper is to be folded to the exact center. You can use the creases you made earlier as the reference.
1j. Fold the other edge to the center too.
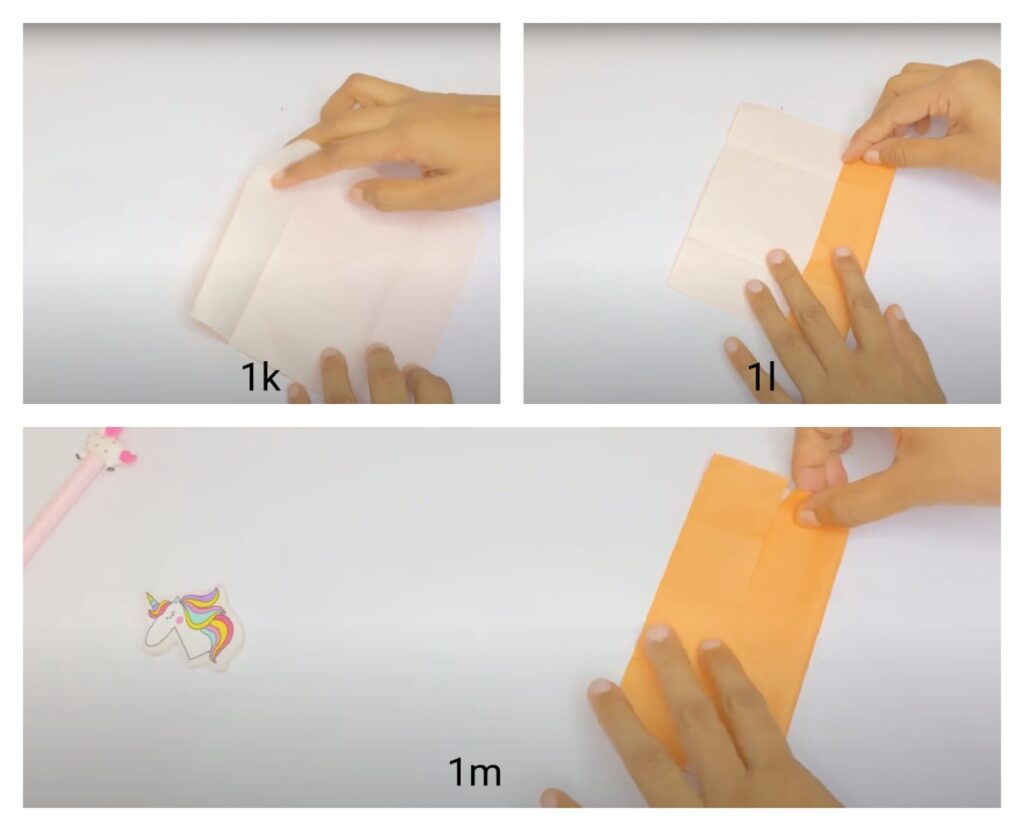
1k. Unfold the paper.
1l. Now, repeat the same steps (1i and 1j) on the other side.
1m. Fold the parallel edges towards the centre and make a crease. Now, hold the paper puzzle vertically as shown in the picture and move onto step 1n.
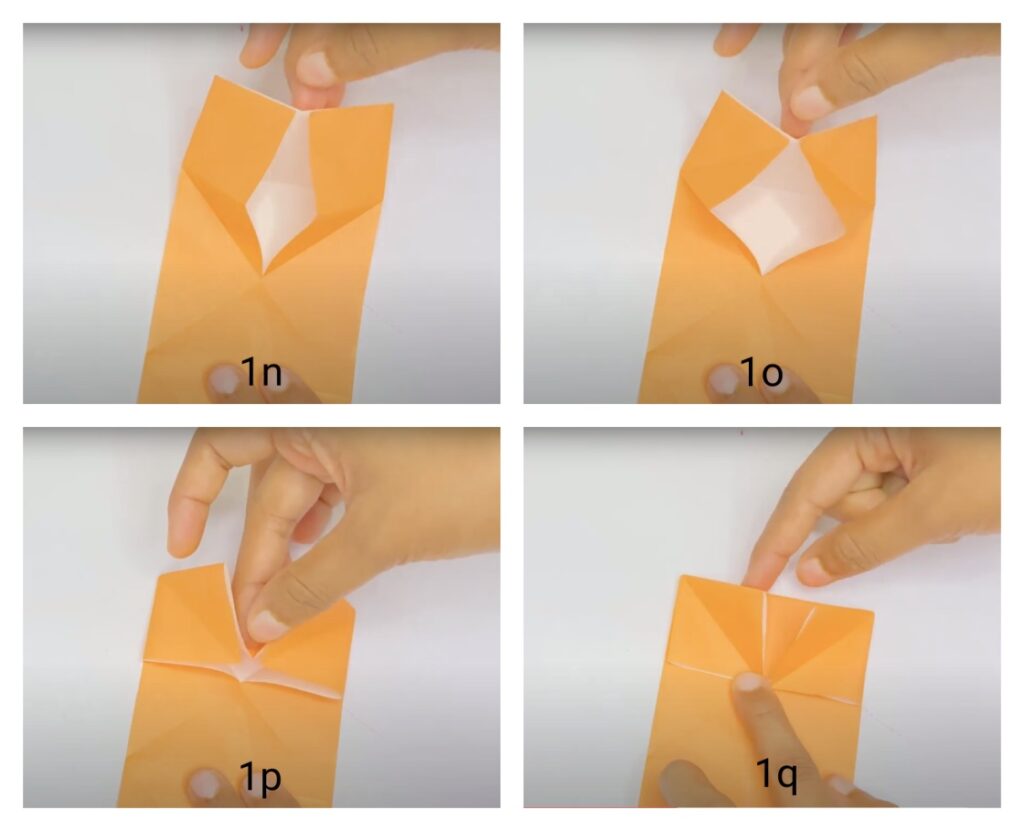
1n. After folding the edges horizontally, what we need to do next to make the paper puzzle is to fold the paper by making the creases we made earlier as reference.
1o. Start by keeping the paper in place with one hand and fold using the other hand.
Slowly fold the top portion of the paper towards the centre.
Use one finger to poke from the middle of the backside directing it towards the center. When you do this, you can see the paper moving along the creases we made earlier.
1p. The middle of the top edge is now folded towards the center. You can see it touching the centre.
1q. You can see two flaps pointing up in the picture 1q. In the next step we are going to flatten them down.
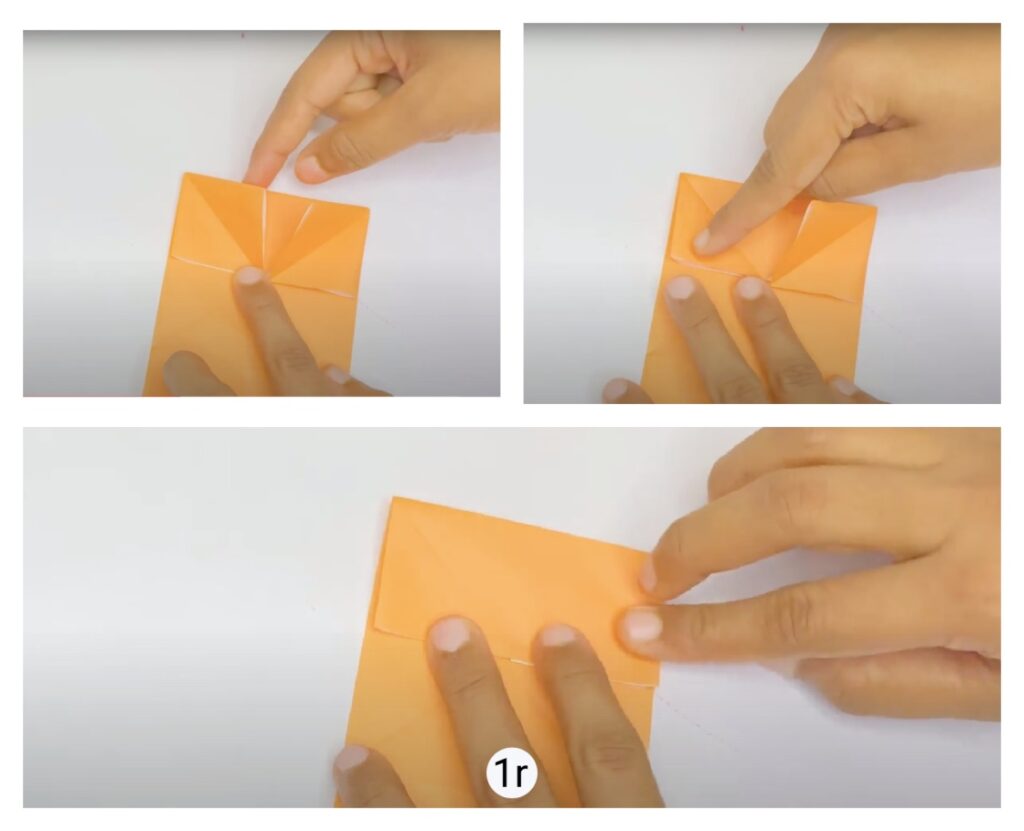
1r. Bring both the flaps down as shown in the above picture.
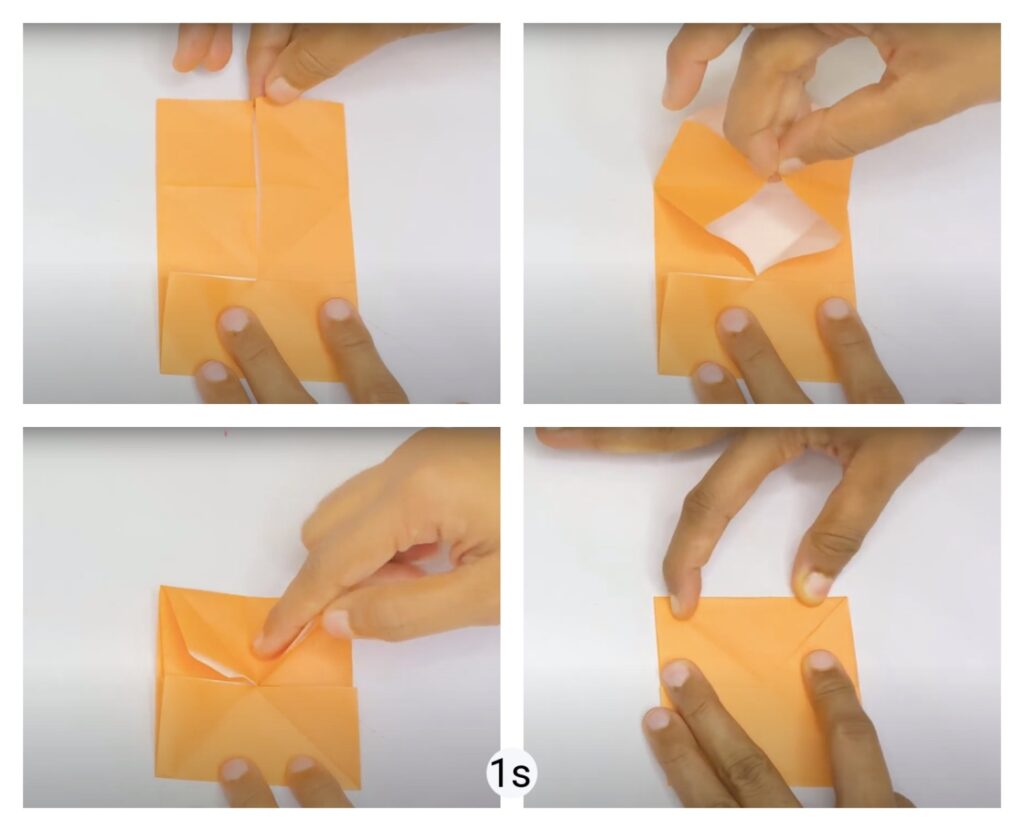
1s. Rotate the paper puzzle by 180 degrees and repeat the same steps (1n- 1r) on the other side.
Step 2: Draw the pictures
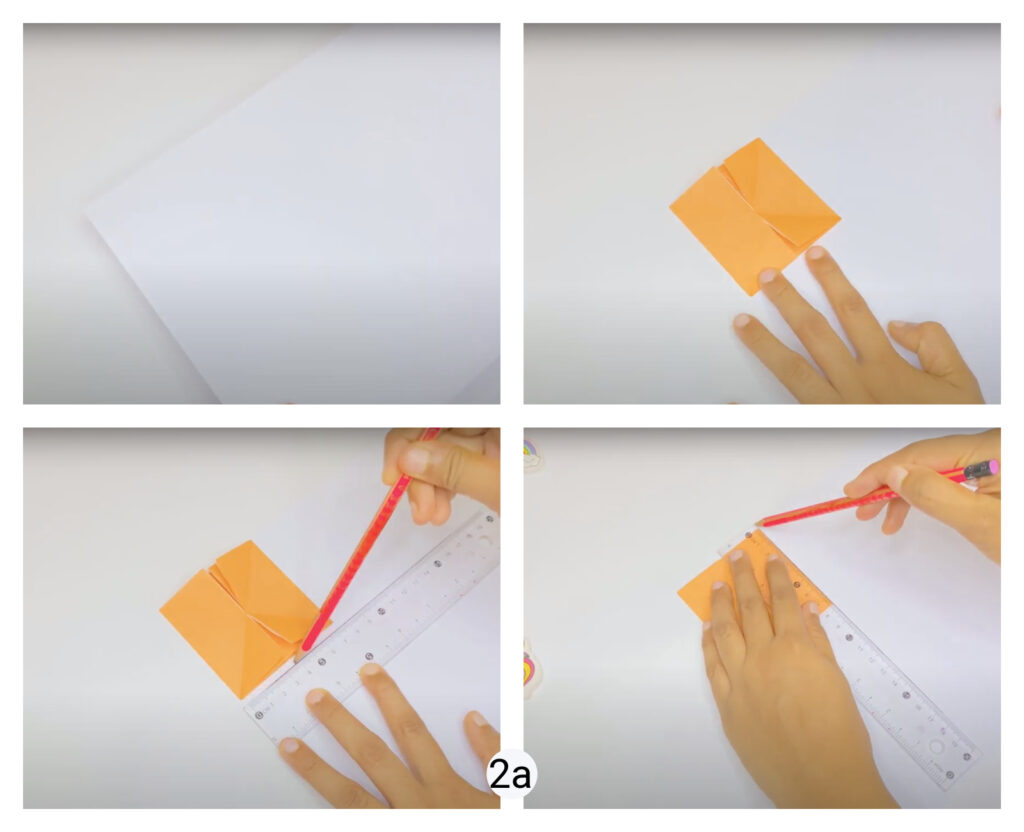
In the second step of making the paper puzzle game, we are going to draw 3 pictures that are to be stuck on the paper puzzle.
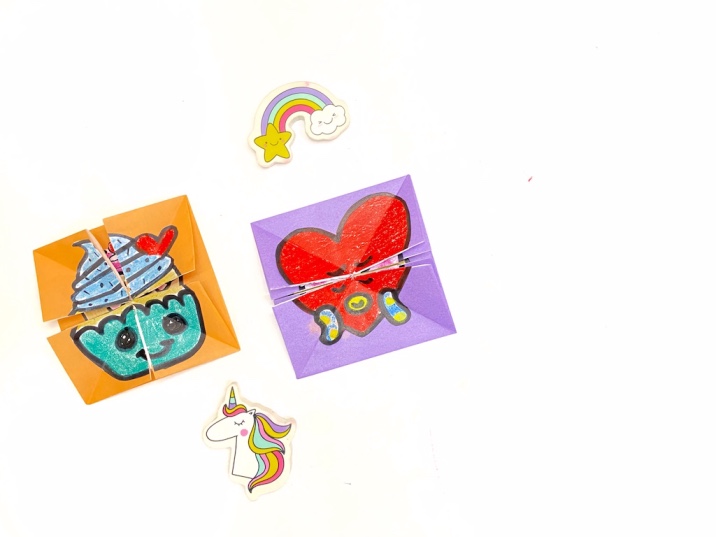
Pictures can be anything – cartoon figures, animals, nature, etc. Here we drew three kawaii figures.
2a. Take a sheet of white paper. And keep the paper puzzle square figure we made just now, on top of the paper.
Trace the outline of the puzzle onto the white sheet. This is to draw the pictures inside the square shape and make sure they fit inside the puzzle.
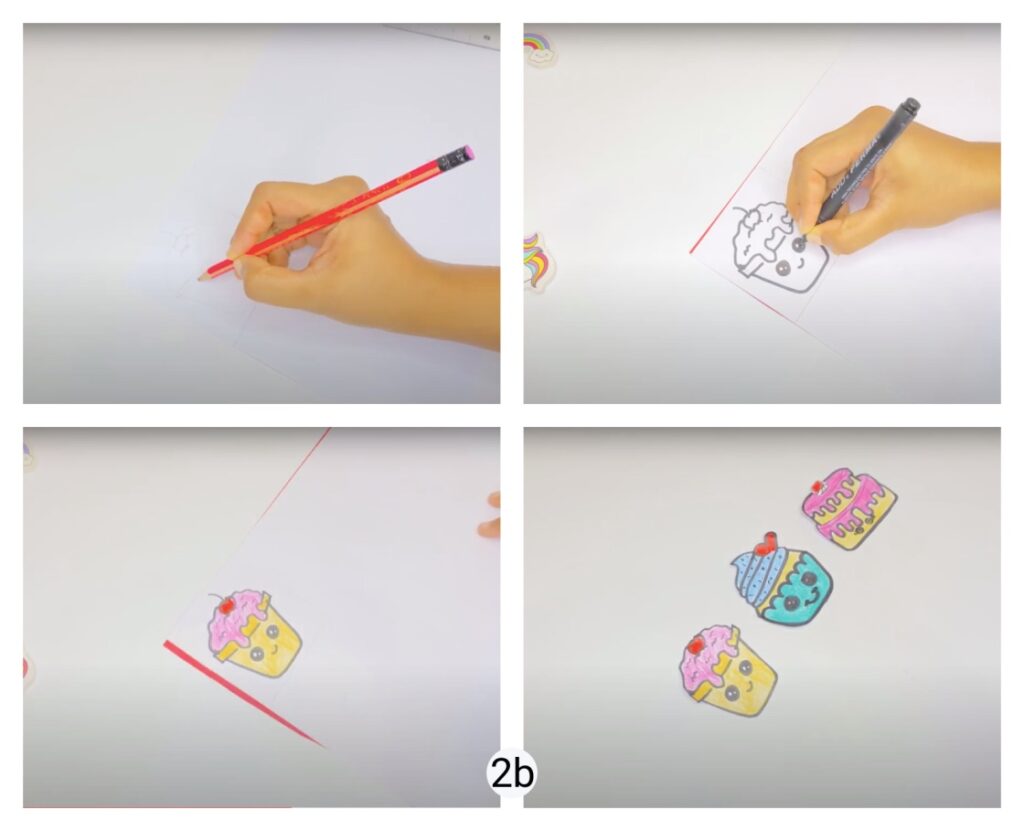
2b. Draw the figures inside the square measurement we took just now. Draw two more figures of the same size and color them. Cut the figures out.
Step 3: Making the paper puzzle game
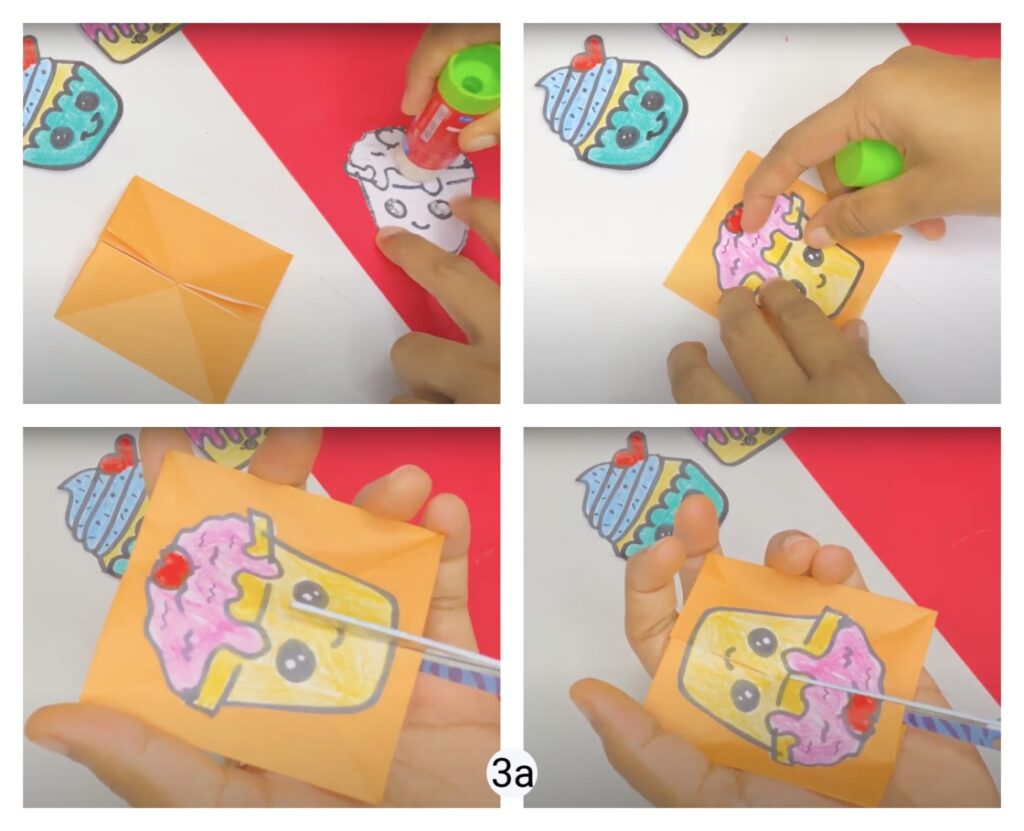
3a. In this step, we proceed to putting the puzzle together.
Take the cutout pictures. Take the first picture and paste it on the paper puzzle.
When you paste the picture, make sure the opening of the paper passes vertically beneath it.
Now we are going to cut along the opening. Make sure you don’t cut too much. Cut only upto the point where you can open the flaps fully.
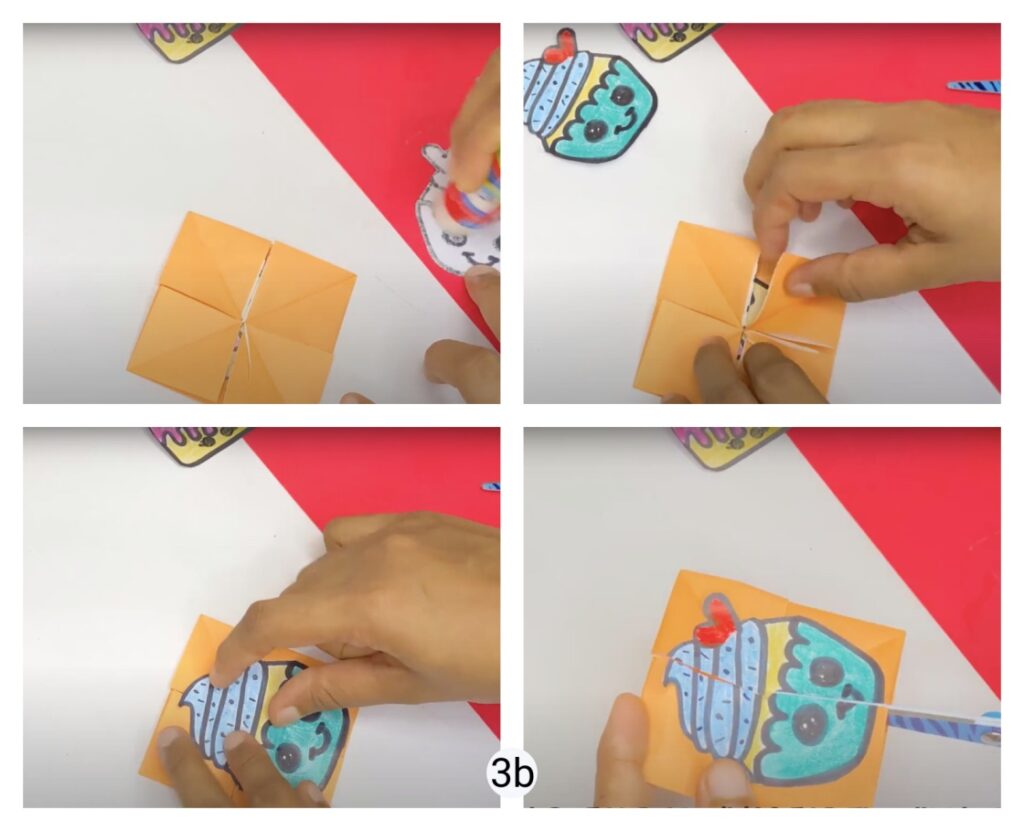
3b. Open the flaps and and you can see the section with four openings.
Now take the second picture and stick it on this section. Like we did with the last picture, cut along the openings.
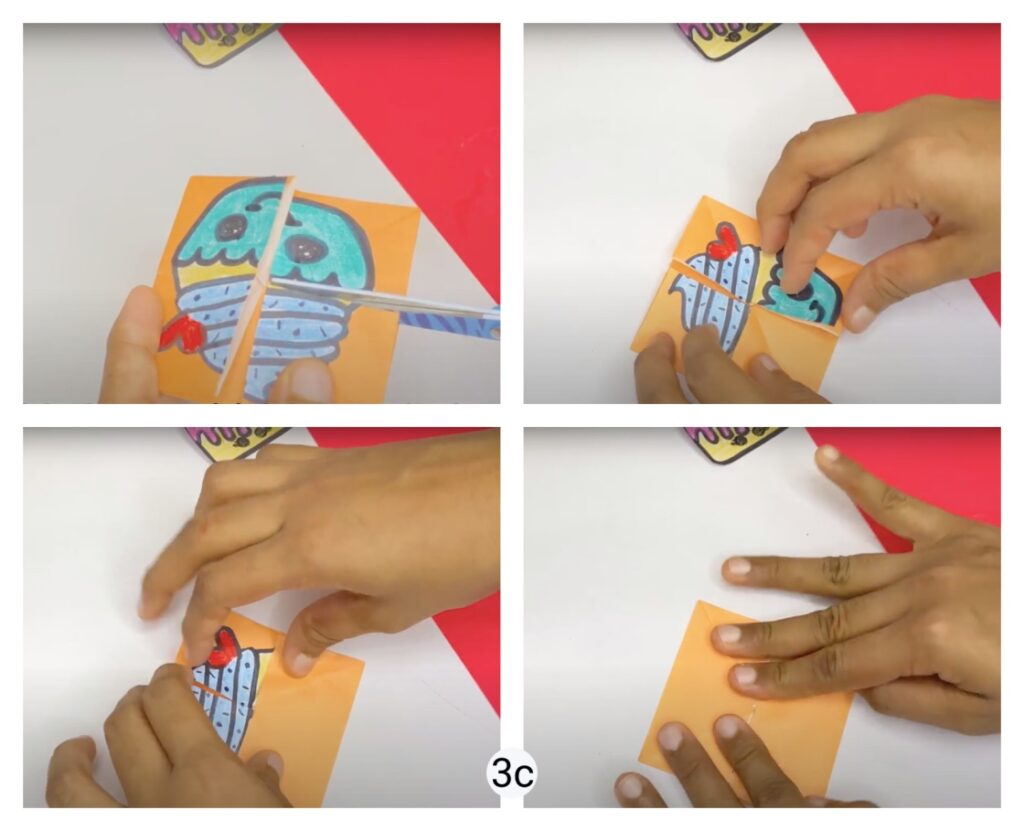
3c. Remember, there are four openings, so cut along on all four of them. After cutting, open all the flaps, and you get to the third section.
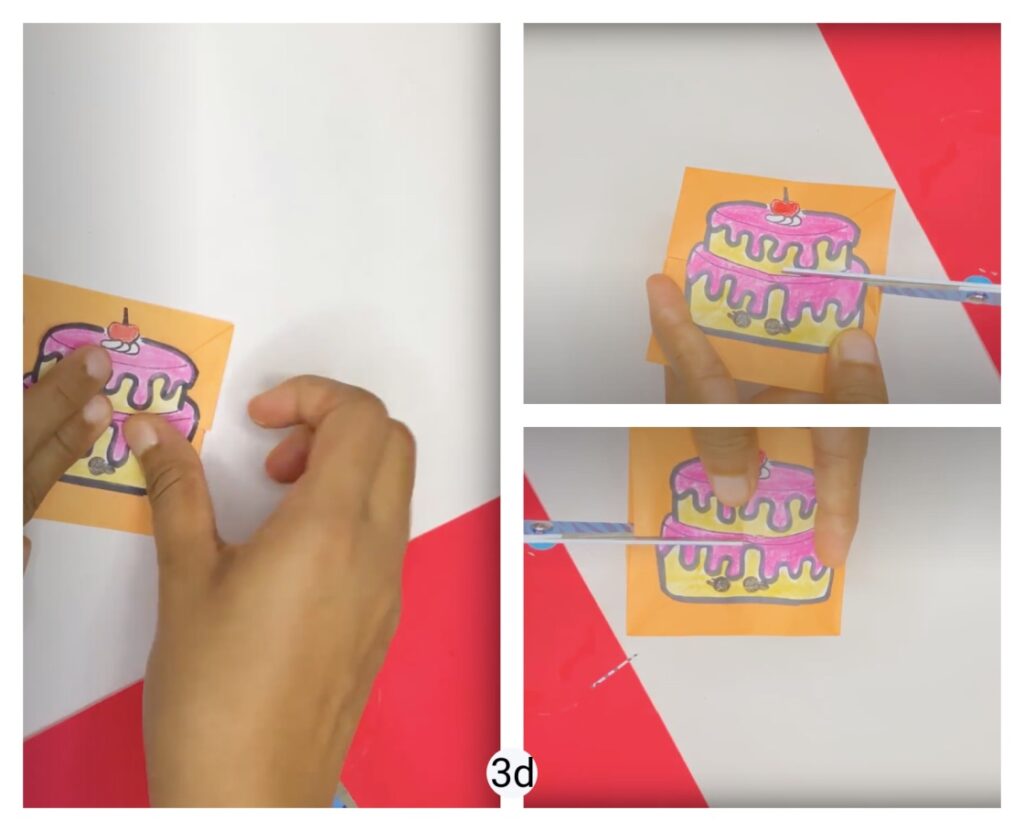
3d. Stick the third and final picture onto the next section and make two cuts along the openings.
This is it and the paper puzzle is ready.
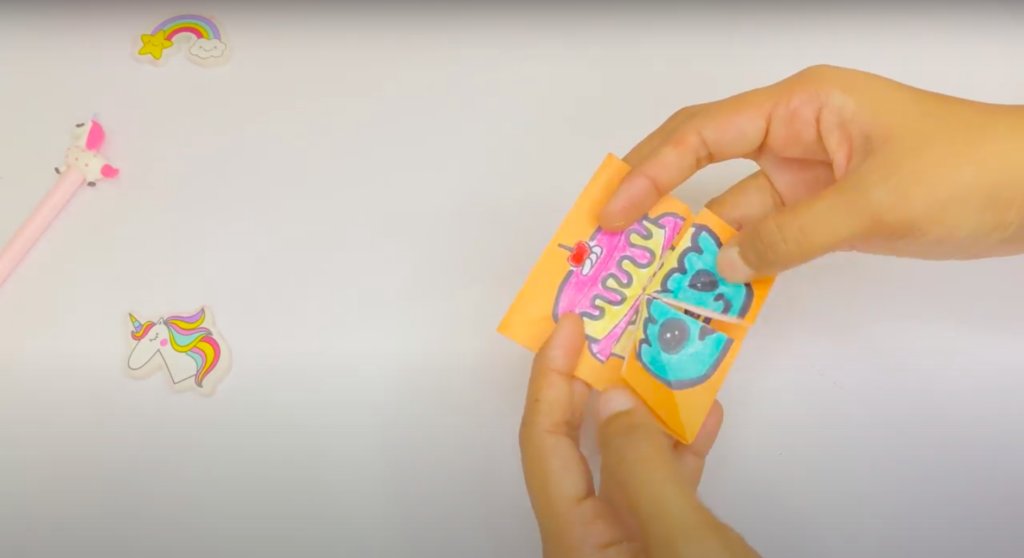
Open the flaps different ways and make a game out of it.
I hope you enjoy making this homemade paper puzzle. Do let me know about your experience in the comments below.
Video tutorial to make paper puzzle game
If you have any doubt regarding any step, watch the video tutorial to make the paper puzzle game on our Youtube channel. We add new and easy craft tutorials every week.
We would appreciate it very much if you will subscribe and help us grow. Thanks in advance!
More paper craft tutorials for kids:
– How to make a paper sunflower step-by-step
– Easy summer popsicle crafts for preschoolers and above (with free template)
– Easy paper jumping frog step-by-step
Like this post? Save for later!
