Cute christmas tree craft using cardboard (with free template)
DIY flat cardboard Christmas tree craft for kids
This ribbon Christmas tree craft is easy to make because all you need is our free template and some basic craft supplies you probably have at home.
These Christmas trees are made using cardboard. If you have made online deliveries for holiday shopping, you can upcycle those cardboard boxes by doing this craft.
After making these Christmas trees, you can use them to make a wall hanging and use as Christmas decor, or turn them into Christmas ornaments and hang them on the tree.
So shall we start making them?
Before moving on to the craft, we would appreciate it very much if you will check out our Youtube channel and subscribe to it. We upload new easy craft tutorials every week there that are different from what we publish on the blog. Thank you!
So, let’s start!
Some of the links in this post are affiliate links, which simply means that if you happen to purchase something, I get a small commission at NO extra cost to you.
Materials Required:
- Cardboard
- Ribbons
- Glue
- Scissors
- Hole punch
- Template #11 – Bow tie Christmas tree craft template (available in our free resource library – get the password by signing up using the form in step 1)
How to make a Christmas tree out of cardboard (step-by-step tutorial)
Step 1: Download and print the Bow Tie Christmas Tree template

Download and print the Christmas tree template. You can download them from the library by signing up using the form available in the next section.
Free printable template for Bow Tie Christmas Tree craft
Get the free template for this craft and password for the library to your email by filling out the form below.
Step 2: Making the cardboard Christmas tree

Cut the trees out from the template.
Take a cardboard piece. Apply glue onto the backside of the tree and stick it on the cardboard piece.
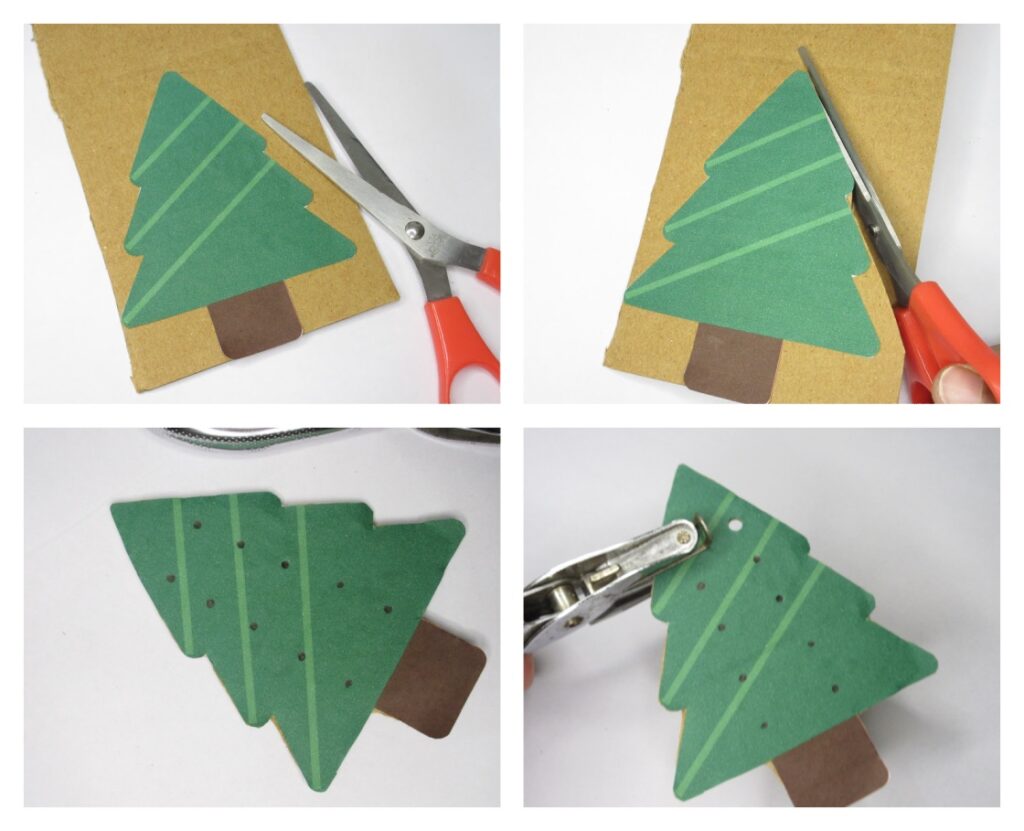
Cut around the shape of the Christmas tree.
Now, we are going to make some holes on the tree to insert the ribbon and make the bow.
Draw 10 dots on the tree using a pencil. There should be 5 rows of dots.
Draw 2 dots on each row, leaving equal space between them.

Now, using a hole punch, make 10 holes as shown in the picture above.
Step 3: Threading the ribbon to make the bow

Now, let’s thread the ribbon and make a bow. Here we use the same method of threading shoe laces in a criss-cross pattern.
Younger kids might need some help here. But don’t worry, with your assistance they can do it perfectly if you follow each picture carefully.
First, start by threading the two ends of the ribbon through the first two holes. Insert the ends from back to the front.
Now, thread the left ribbon end through the second hole on the right side.

After that, in the same way, thread the right end of the ribbon through the second hole on the left side, making a criss-cross pattern.

Now both ends are behind the tree. Take the left end, and thread it up through the third hole on the left side(top right pic in the collage).
Similarly, take the right end and thread it up through the third hole on the right side.
And then, insert the left end of the ribbon through the fourth hole on the right side.

Similarly, thread the right end of the ribbon through the fourth hole on the left side.
Now, both the ends are on the back side of the tree. Bring them both to the front by inserting through the last two sets of holes from back to front (see the pic above).

Make a bow, and it’s ready!

Make more bow tie Christmas trees and use them creatively to make homemade decor or Christmas ornaments.
Try making them and let us know how it went in the comments below!
